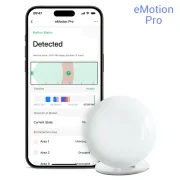
eMotion Pro: The mmWave Presence Sensor with Infrared (IR) That Changes Everything in 2025
If you’re into home automation and Home Assistant, you know finding the perfect sensor is like chasing the Holy Grail. We want accuracy, speed, and ideally not a house full of a dozen different gadgets. Today we’re taking a deep dive into the LinknLink eMotion Pro, a device that not only detects presence with millimetre-level technology, but also includes an infrared (IR) transmitter to control your air conditioner and TV. And the best part is its native Home Assistant integration!
On YouTube I share more tutorials, hands-on tests and real smart home setups. Subscribe on YouTube
Related video on YouTube
VideoWhat Makes the eMotion Pro Unique?
Unlike traditional PIR sensors that only detect sudden movement, the eMotion Pro uses 24 GHz mmWave. This lets it detect real human presence, even if you’re sitting completely still reading on the sofa or sleeping.
Key features:
- mmWave Presence Sensor (24GHz): Range of up to 7 metres with millimetre-level precision.
- Long-range IR blaster: Control your TV, air conditioner, sound systems, and more.
- Integrated light sensor: Perfect for automating lights based on ambient brightness.
- Detection zones: Lets you define specific distances (for example, knowing whether you’re right on the sofa).
- Connectivity: USB-C and setup via Wi-Fi (2.4 GHz).
Home Assistant Integration: The Magic of MQTT
One of the areas where the eMotion Pro really shines is its integration. Forget wrestling with complex integrations or weird hacks.
Thanks to the MQTT protocol, once it’s set up in its app, the devices appear automatically in Home Assistant.
- Air Conditioner: Creates a
climateentity directly (thermostat) with fan and temperature modes. - IR devices: Every button you learn in the app becomes a button entity in HA.
- Sensors: You’ll get entities for presence, exact user distance, and brightness level (lux).
Quick Setup Guide
- Installation: Connect the sensor using its USB-C cable. Use the included 3M mount to angle it vertically (avoid placing it on the floor or pointing it at the ceiling).
- LinknLink app: Download the app, sign up, and add the device.
- CRITICAL update: As soon as you add it, update the firmware. This enables zone detection and fixes light reporting issues in Home Assistant.
- Set up MQTT: Enter your Home Assistant server IP, port (1883), and credentials. Done!
eMotion Pro vs Max vs Ultra: Which Should You Choose?
The eMotion family is growing fast. Here are the key differences:
- eMotion Pro: The perfect balance. 24GHz mmWave (linear detection).
- eMotion Max: Steps up to 60GHz, allowing you to map a room in 2D and detect up to 4 people at once. Note: this one does not support MQTT for mapping IR devices.
- eMotion Ultra: It will also include a temperature/humidity sensor, fall detection, and act as a Bluetooth Proxy.
Where to buy
If you are interested in LinknLink eMotion Pro, here are the available purchase options:
- LinknLink eMotion Pro — Reviewed in the video: Official website · Amazon · AliExpress
Conclusion: Is It Worth It?
Absolutely yes. The eMotion Pro has allowed me to retire two devices (an old presence sensor and a Broadlink) and replace them with a single, more attractive and functional unit in my living room. For the price and how easy it is to integrate via MQTT, it’s currently the smartest choice for those of us using Home Assistant.
HectorziN’s tip: Don’t make my initial mistake; make sure you aim it properly at the passage or resting area. Since it’s directional, placement is everything.
Did you find this article useful? Don’t forget to visit my YouTube channel to watch the step-by-step setup video and grab the best discount codes. Happy automating!